Create a Custom Report
Creating reports in Helios is one of the most fantastic features available. This guide will walk you through creating a basic report.
1. Click here

2. Click here

3. Click the search box. And look for the following:
Type Name and select...First Name and Last Name from Employee Details.

4. Click here

5. Click here

6. Next, clear out the search box by clicking the little 'x'

7. Click here

8. Before we go any further, let's go over a few other features on this page.
Hover Over Descriptions - Hovering over orange buttons on this page will provide you with a basic explanation as to what action is performed by that button.
Expand / Collapse All - These buttons come in handy when looking through fields.
Expand: will open up all the dropdown options under the header name for each field.
Collapse: will close all dropdowns under the headers for each field.

9. Locate the Employee Details folder in the Field Selection window and select the following fields.
Address
City
Employee Type
Original Hire Date
State
Zip

10. Click here

11. Click here

12. In the report preview you can drag and drop the fields.

13. Report Preview! This new feature makes creating reports in Helios a breeze!
Report preview allows you to see a sample of the report you are creating in real time.
Keep in mind only a small portion of the report is available. ONLY SOME of the records in the report will be displayed here.
This will allow users the ability to understand the report before moving forward.
For example, have you ever generated a report in Helios and received multiple records for an employee? By adding one field at a time, you can easily determine which field is causing the duplicates.
TIP - Reorder the columns by dragging and dropping. You can also drag columns into the "group by" section to create more dynamic reports.

14. For this report, let's say we only want Certificated employees. So we need to filter this report accordingly.
Click on the funnel icon to open up the Filter Report pop-up.

15. Welcome to the Report Filters window. Before we go any further, let's take a look at the features here and what they do.

16. These frequently used filters have been conveniently grouped together in a single section. To utilize any of them, simply check the corresponding box next to the filter.
Since we only want Certificated employees for this report, we will select the "Include only Active Certificated" option from the top.

17. Select from these filter lists to filter the report by employee location or job class.
Leaving these blank will include all job classes and locations in the report.

18. Substitute Today's Date for Current Date in Date Filters: To use the current date as a date filter, enter today's date as filter value in the filter criteria below, and the system will always use the current date whenever the report is run.
Substitute first school day with current school year start date in date filters: To use school year start date in a date filter, enter the start date of the current school year as filter value in the filter criteria below, and the system will always use the current school year start date whenever the report is run

19. This button will take you to the advanced filtering options window.
Let's check it out!

20. This is where you can filter the report by these advanced fields.
Use the Search field or the Field List to find the Employee Details dropdown, expand that, and then locate the Last Name field and check the box. Once complete, the window will close.

21. Click here

22. Next to "Employee Type" you will see a blank field with the following filter operators (the value will be specified next):
Equal - Only display fields in which the field is equal to the value. (Must be typed exactly how it appears on Helios)
Not Equal - Only display fields in which the field does not equal the value. (Must be typed exactly how it appears on Helios)
Greater Than (Or Equal) - Only display fields in which the field is greater than (or equal to) the value specified.
Less Than (Or Equal) - Only display fields in which the field is less than (or equal to) the value specified.
Begins With - Only display fields in which the field begins with the value.
Ends With - Only display fields in which the field ends with the value.
Contains - Only display fields in which the field contains some text that is detailed in the value.
Not Contains - Only display fields in which the field does not contain some text that is detailed in the value.
In - Only display fields in which one or more fields are specified.
For example, first name IN Amy, Ben
(Think of it like "includes")
Not In - Excludes fields in which one or more fields are specified.
For example, first name NOT IN amy, ben
*This will provide results for all first names that are not Amy or Ben
Is Blank - Only display fields in which the field is empty.
This is great for finding fields in a report that have no values, such as employees who are missing a field in their employee details.
IS NOT BLANK - Only display fields in which the field is not empty.
This is great for finding fields in which a specific value is present.
*These options vary by field type
For this example, we will be selecting "Greater Than or Equal".

23. Here we can specify the value we want.

24. Click the Filter Report Button.

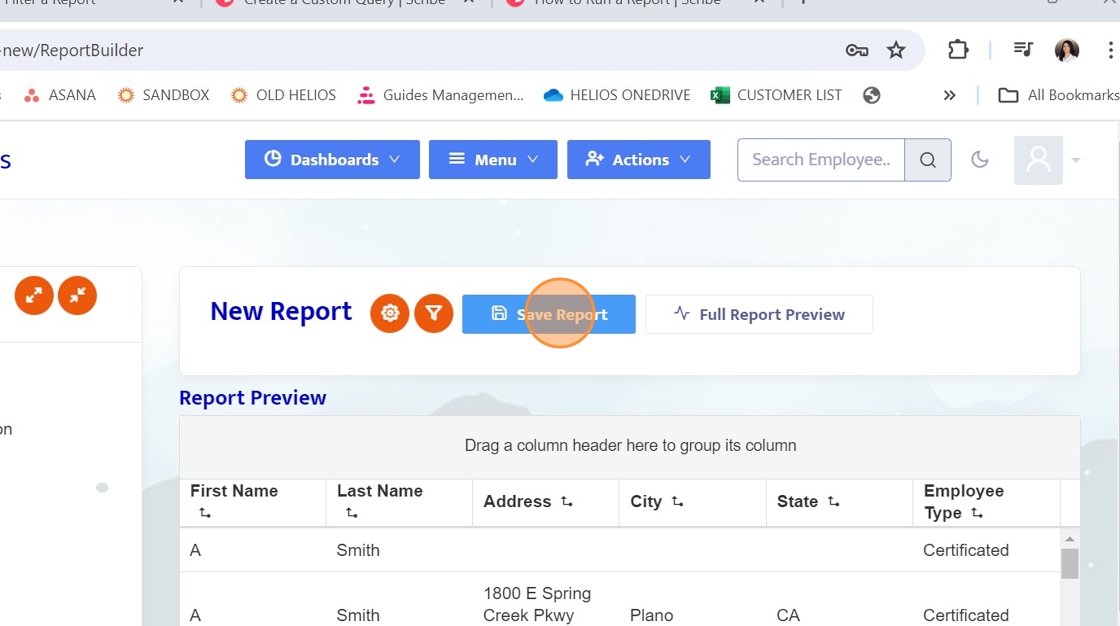
25. Let's save this report.
Click Save Report.
26. Here you can modify the properties for the report we just created.

27. Let's give this report a name.
You can name it something like "Test Report".

28. Marking a report Confidential limits user access to only District Admins

29. Here you can specify how you want the report to appear, landscape or portrait.
*Reports with many rows may appear best in portrait.
Reports with many columns may appear best in landscape

30. This option allows users to choose between a traditional report, designed to showcase selected information, or a query.
Queries define specific groups of people for tasks like scheduled assignments or group communication.
For more information, we offer a guide on creating custom queries. When you complete this guide feel free to check it out in the "Reports" folder.
For this example we will select "Report".

31. Here you can add a description for this custom report.

32. Save these changes.
